
Building a fitness tracking app with Java - Part five
What we’re going to work on
As mentioned in part four, we’re going to start working on the main functionality of our app: the log workout screen.
Planning
Due to the complexity of this part, I’m going to create some wireframes with a pen and paper before I start writing any code - here’s what I came up with:
Start workout screen

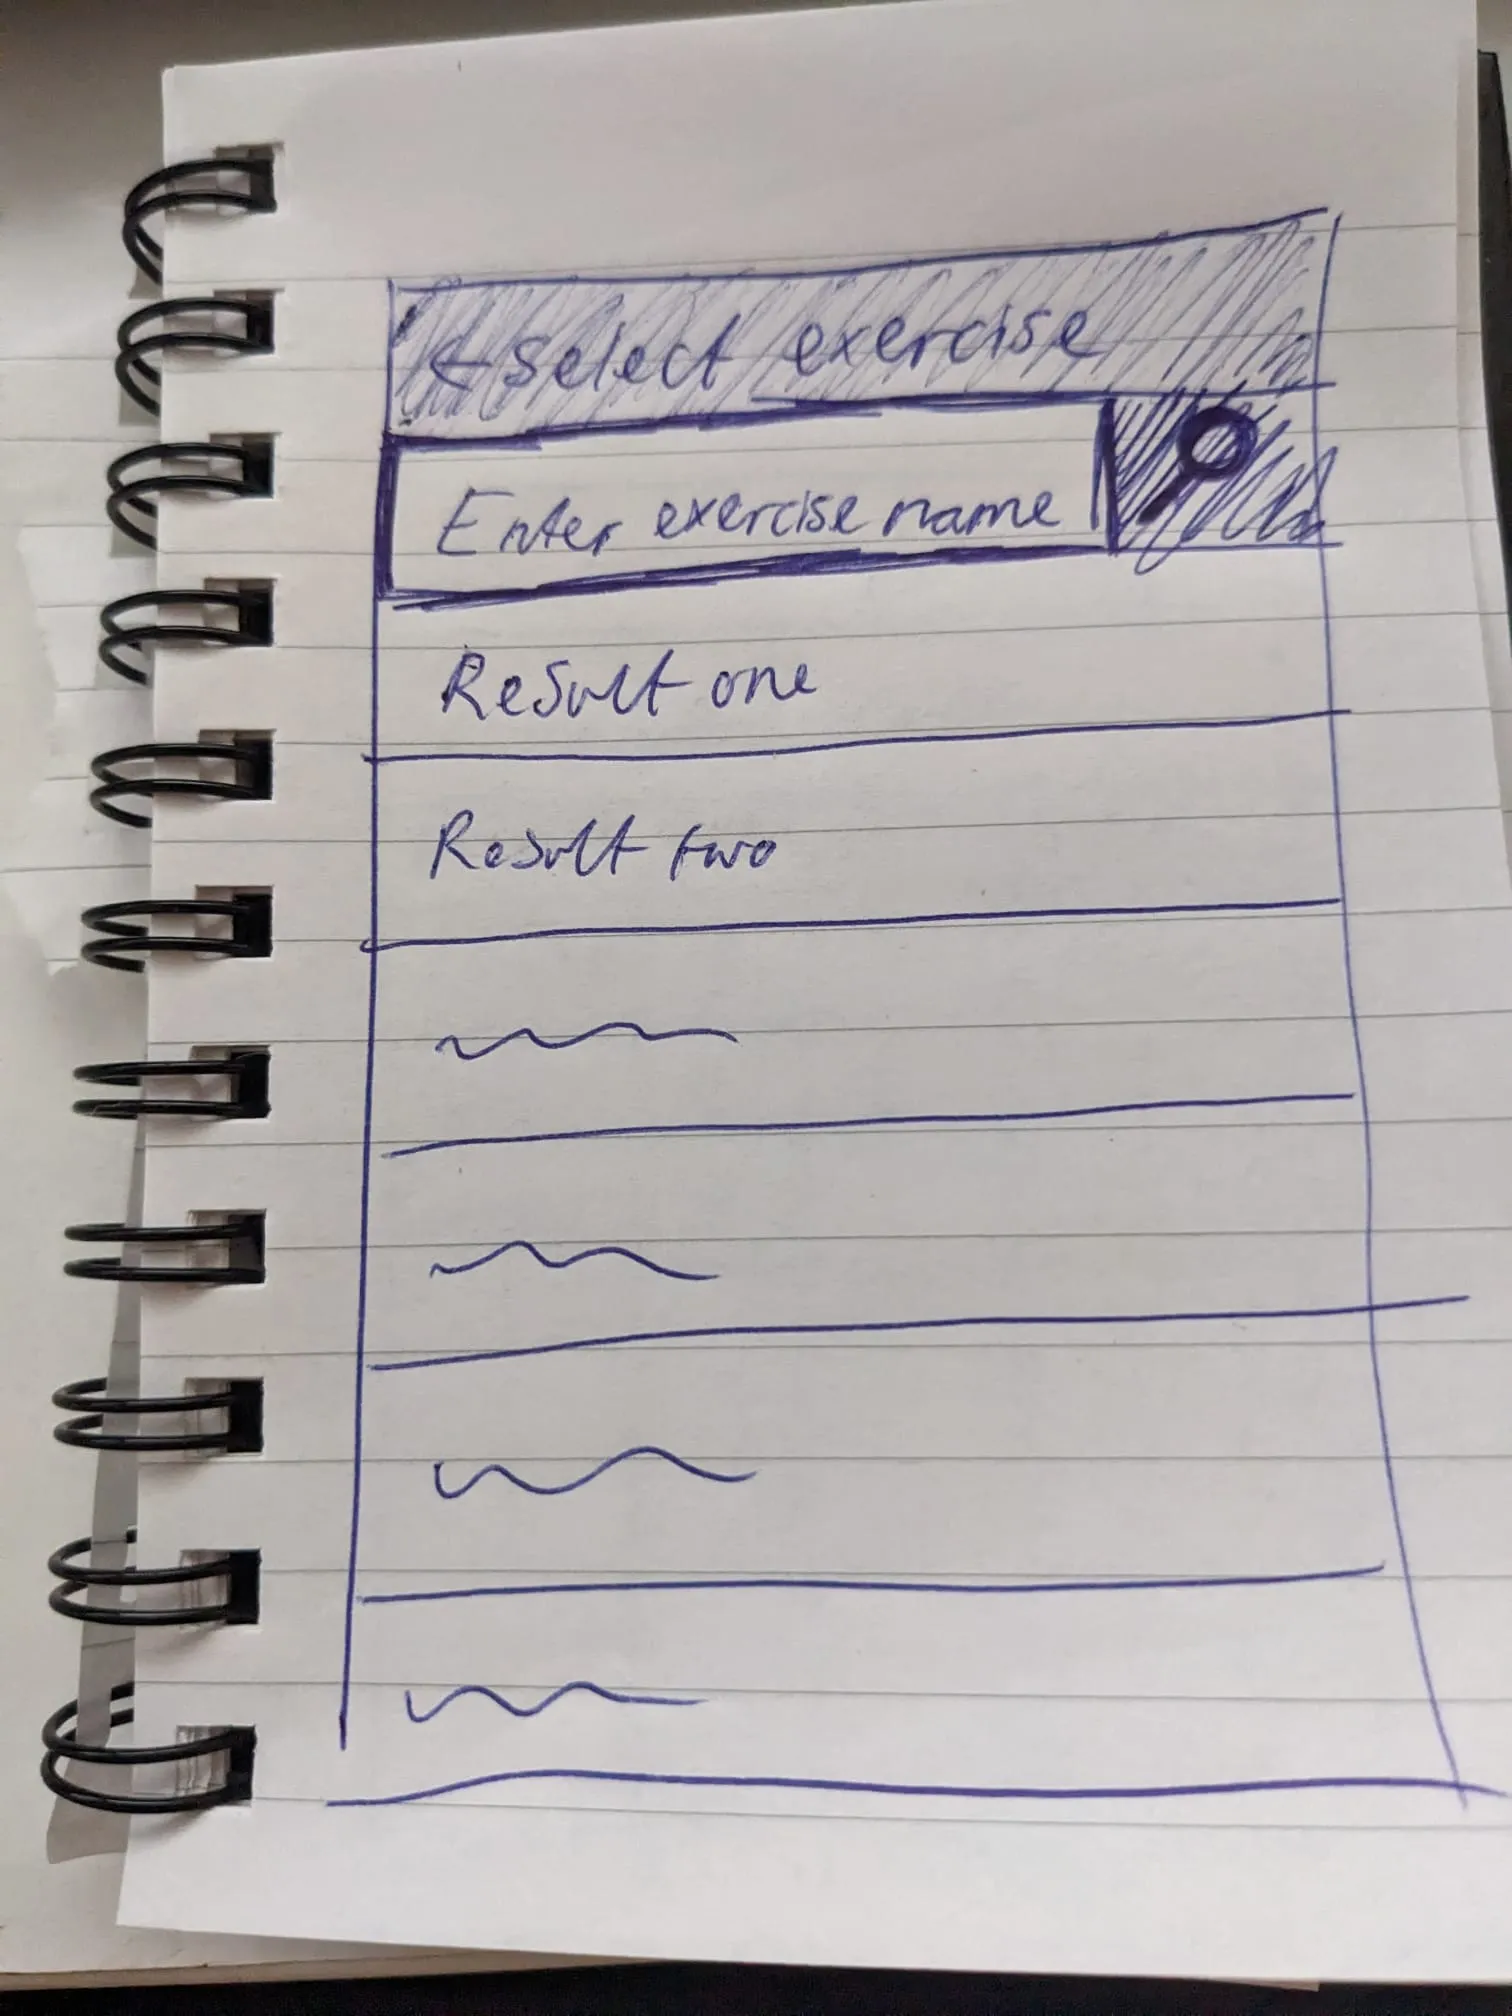
Select exercise screen
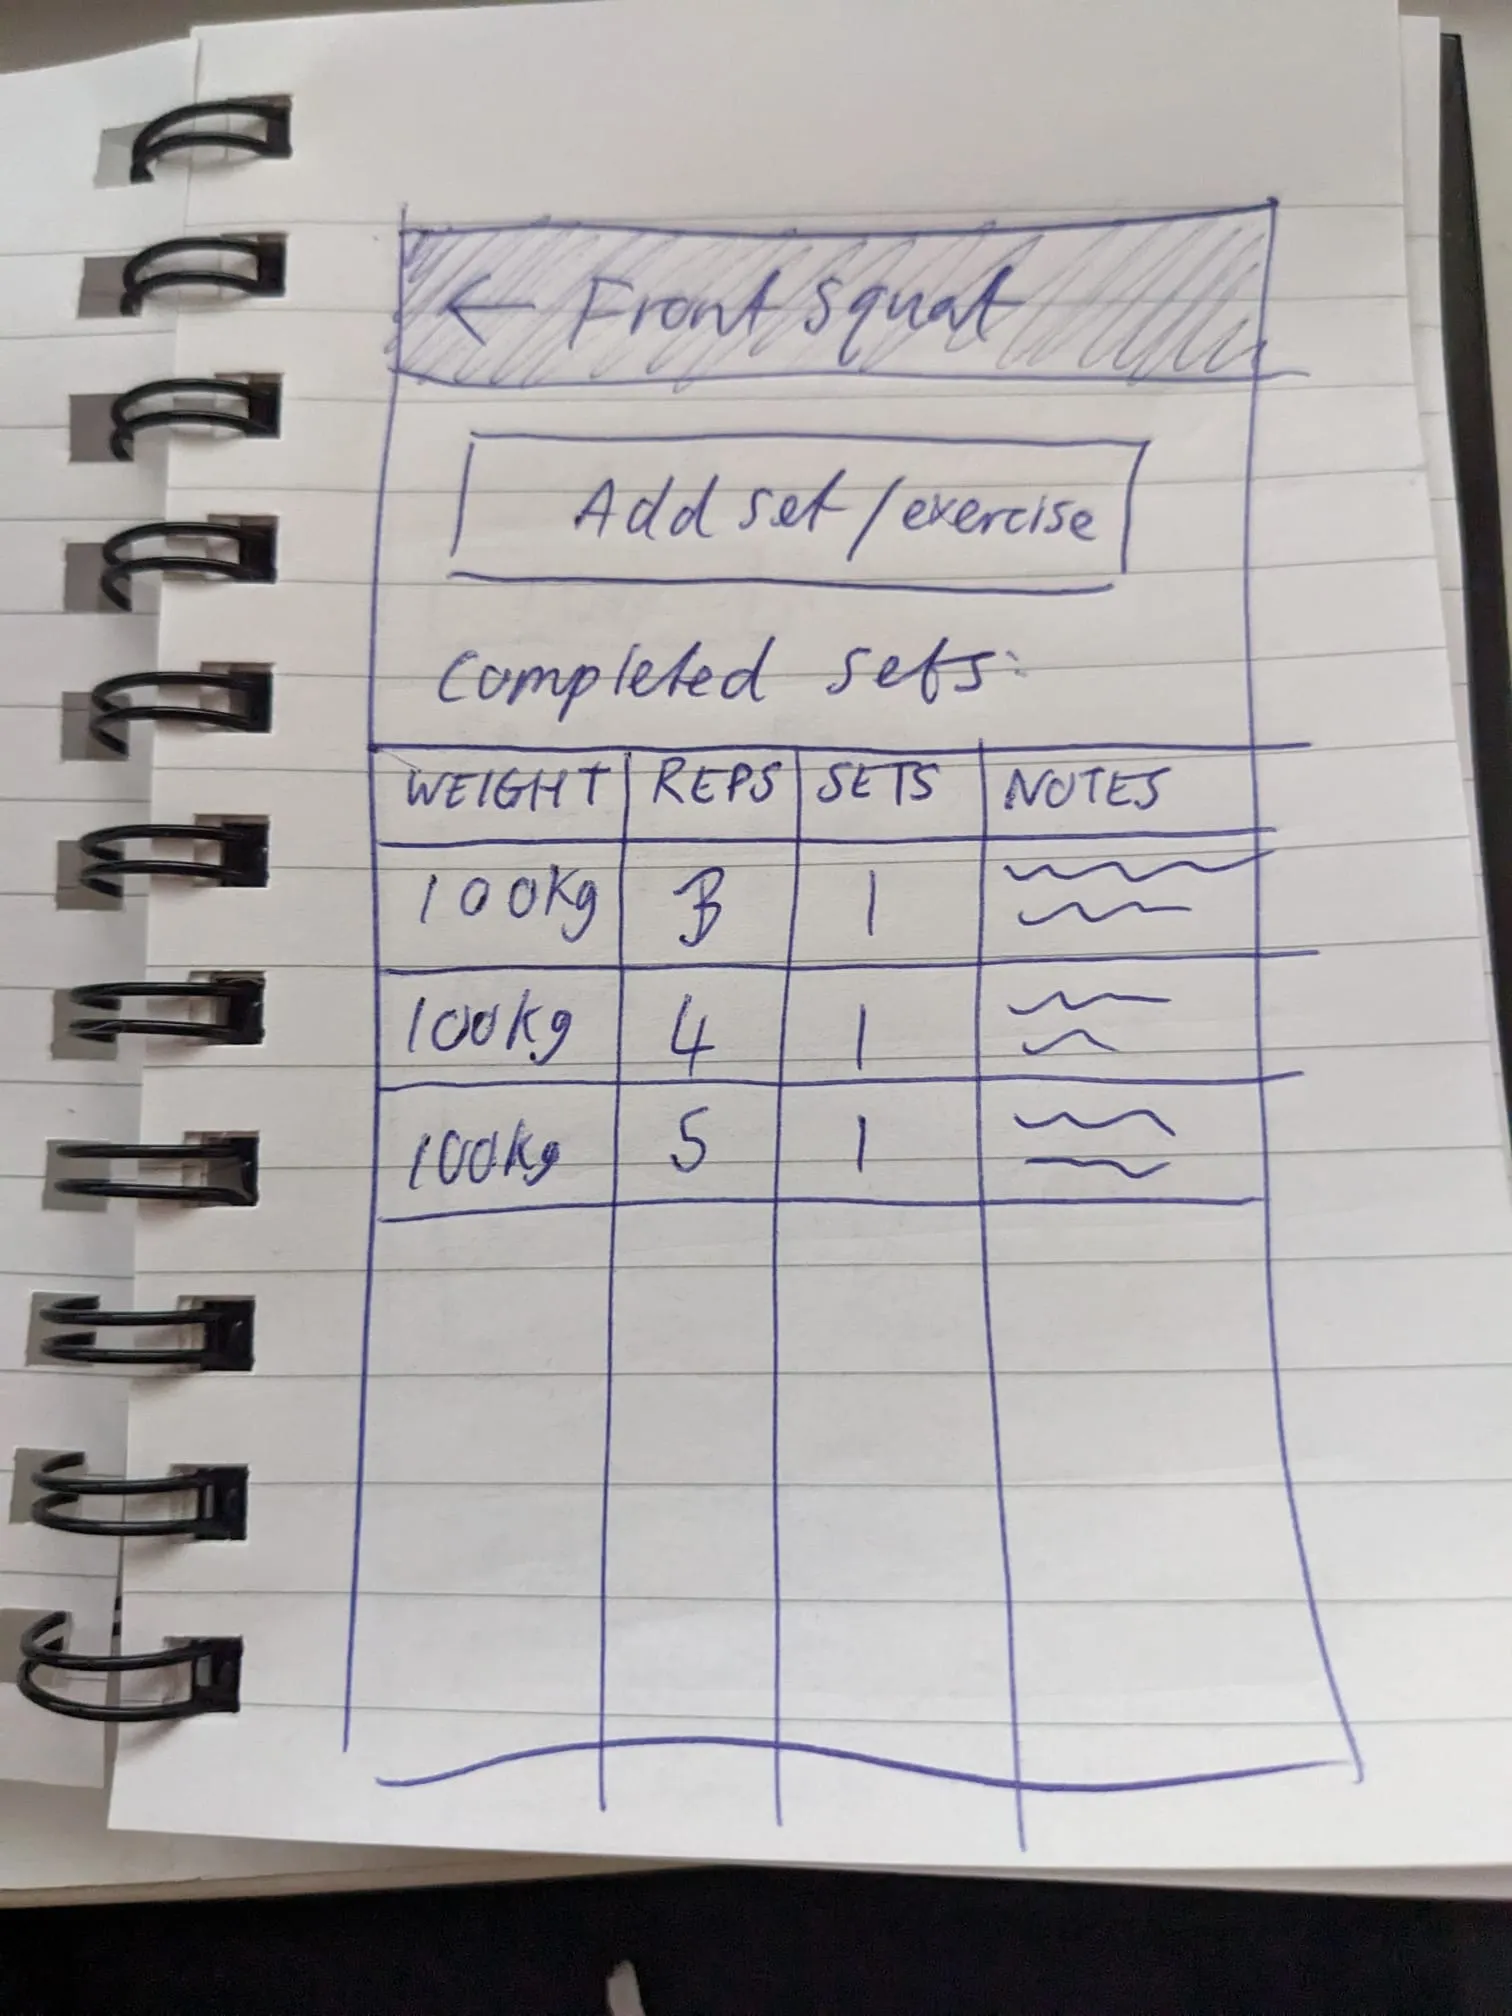
Exercise summary screen
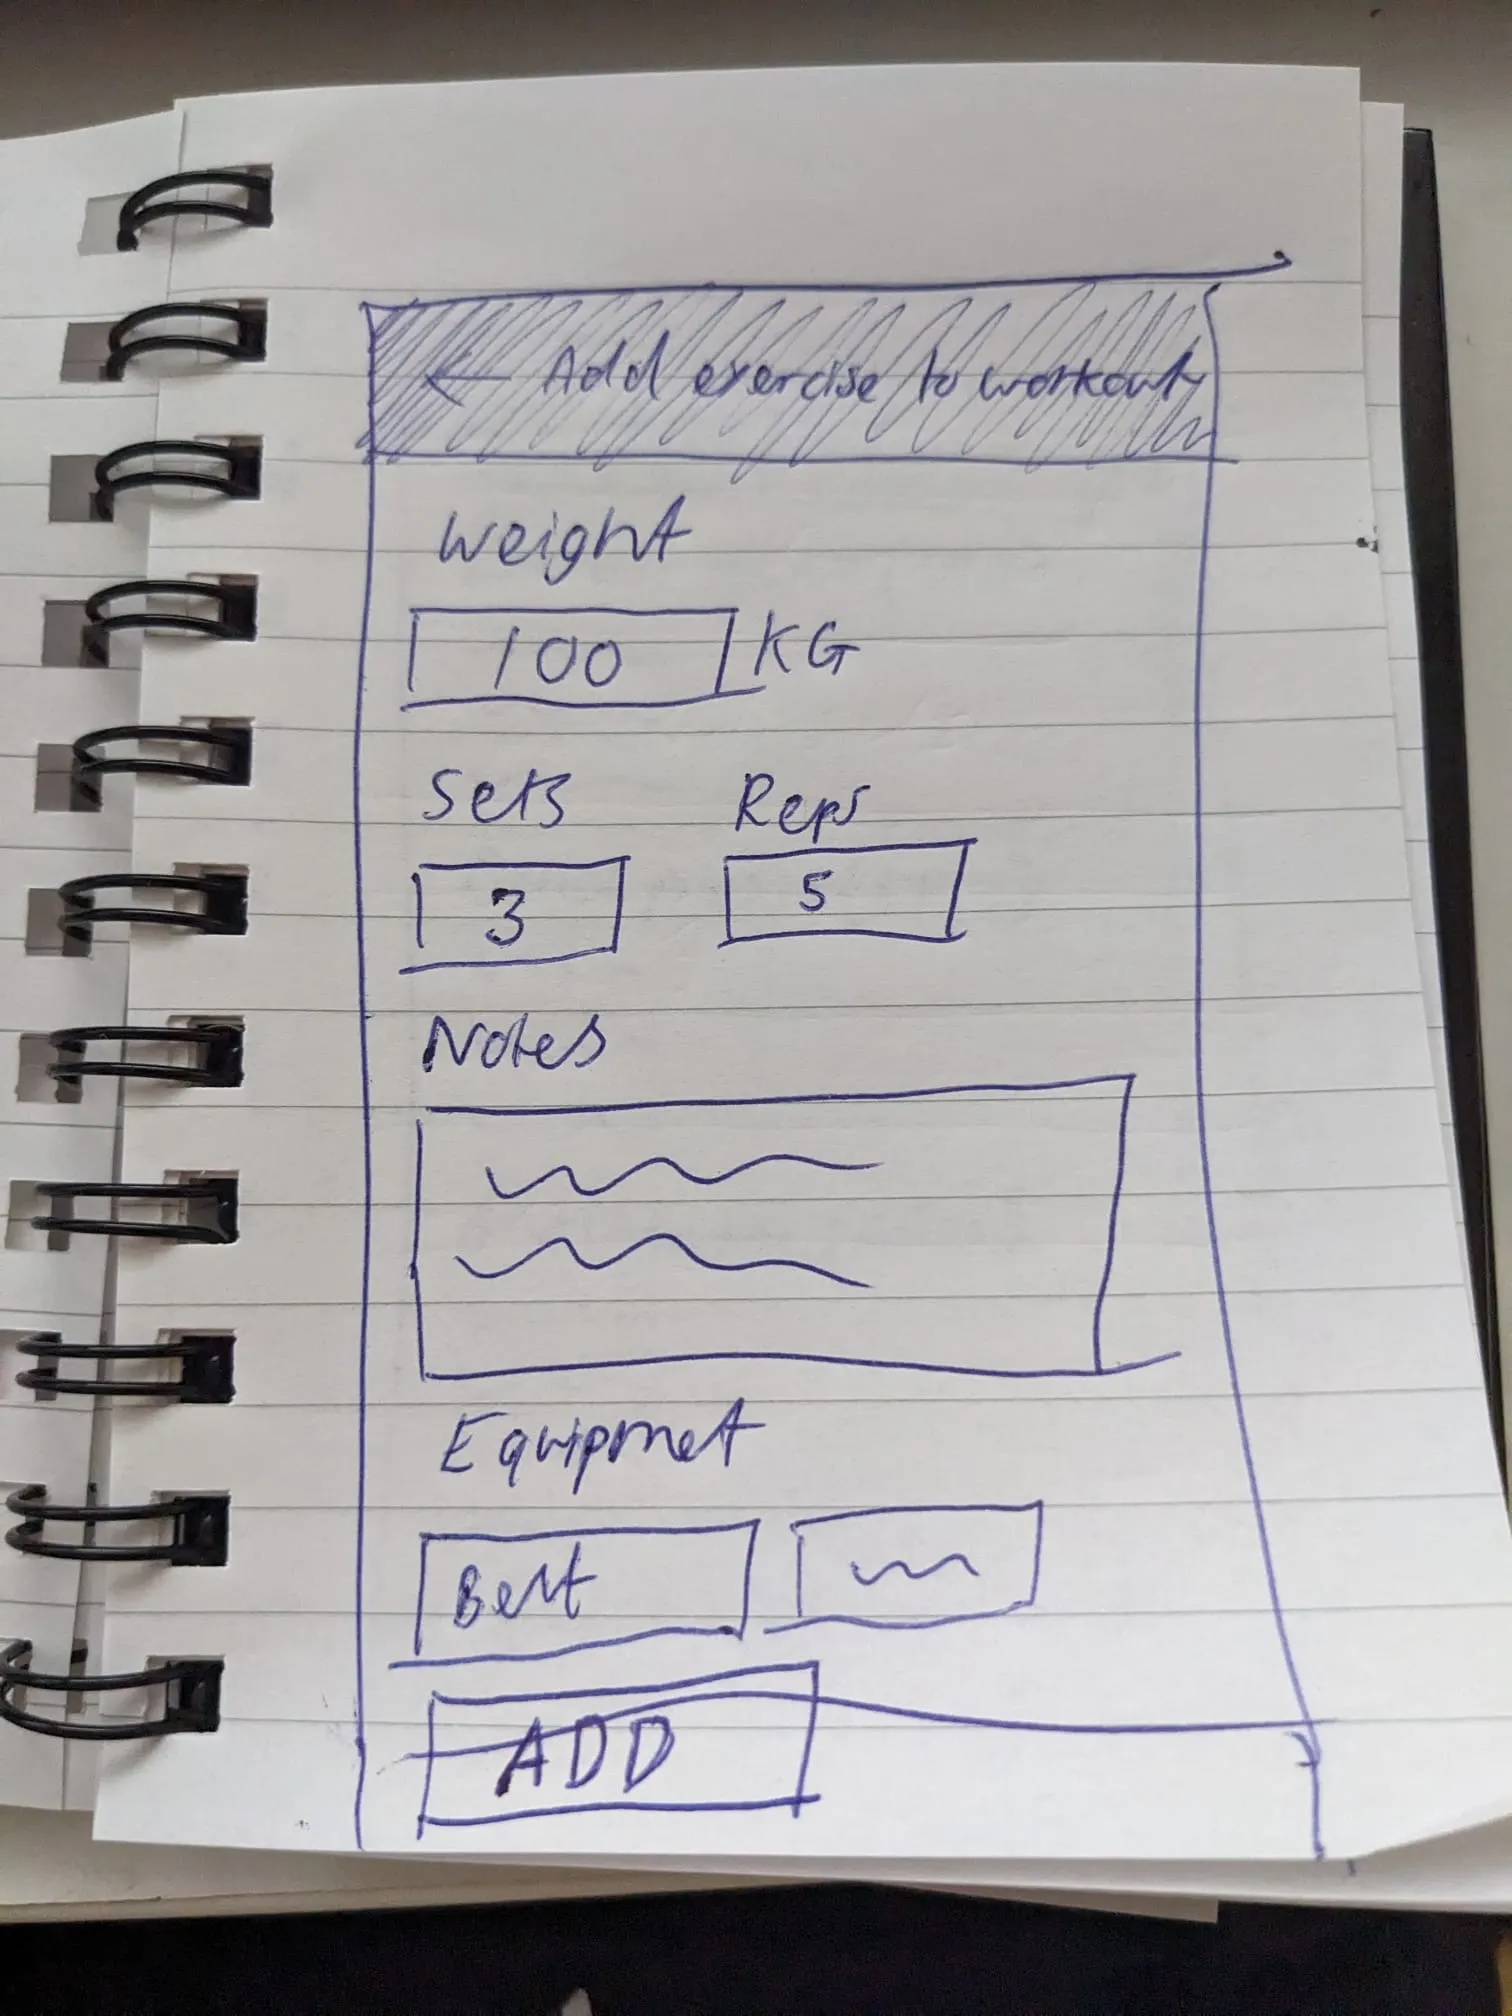
Add exercise to workout screen
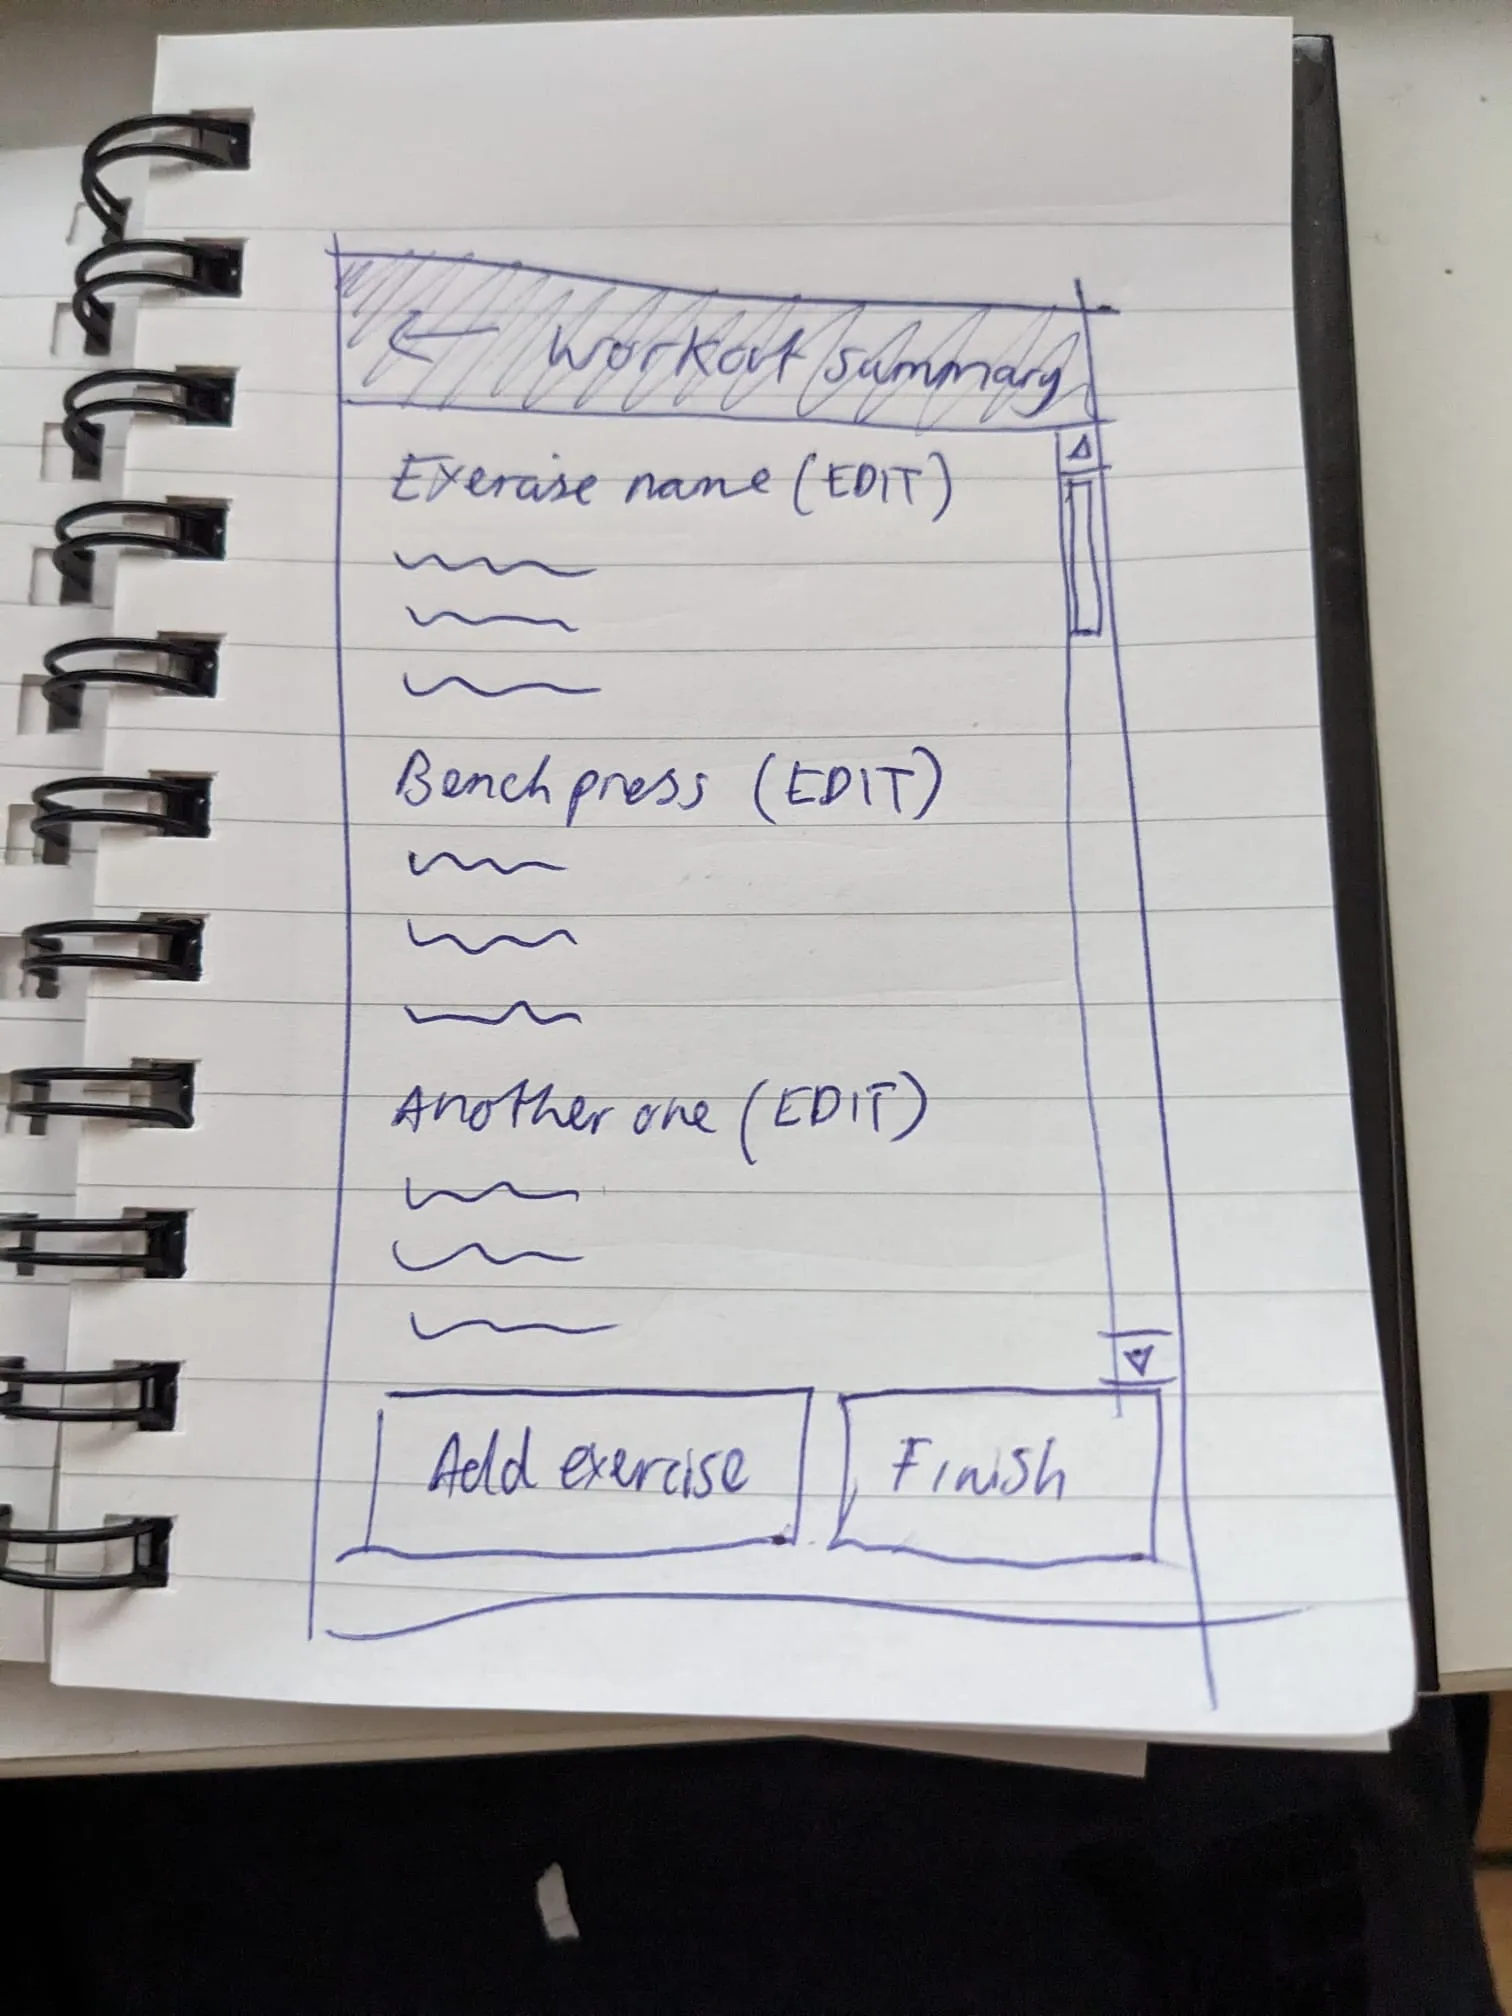
Workout summary screen
The flow is:
- User clicks start workout on the initial screen
- User is sent to the select exercise screen, this is where the user chooses the exercise.
- User is sent to the exercise summary screen with the previously selected exercise set as active, this screen contains completed sets for the selected exercise, user clicks the “add set” button to add a new set
- User is sent to the Add exercise to workout screen, this is where the user adds the sets, reps, equipment and notes, after finishing, they click “add”.
- User is sent back to the exercise summary screen with the previously added set displayed in table.
- User can press back to go to the workout summary screen, the user can:
- Add another exercise (which will send the user back to the select exercise screen)
- Add notes to their overall workout
- View their existing exercises (and edit them if needed)
- Finish the workout.
- Clicking the finish workout button will prompt the user with a confirmation modal, asking them if they want to finish the workout. The initial version won’t have a way to edit workouts so we need an additional barrier to stop users accidentally clicking the button.
- After confirming the workout is finished, they’ll be sent back to the initial screen.
We don’t know how this will perform in practice until we actually use it during a workout, but it’s a good starting point.
Building screens
We’ve already built the APIs that power these screens, so most of the coding we’ll do will be writing the screen layouts and talking to our APIs. We’ll try and get something minimal working first, and then work on improving it afterwards.
Layout
First we’ll create a separate layout for the log workout process so that we can add a header with a title and a back button. With Expo this is as simple as creating a _layout.tsx file in our log-workout folder with the following content:
import { Stack } from "expo-router";

export default function LogWorkoutLayout() {
    return (
        <Stack>
            <Stack.Screen
                name="index"
                options={{
                    headerShown: false
                }}
            />
            <Stack.Screen
                name="select-exercise"
                options={{
                    title: 'Select an exercise'
                }}
            />
            {/* ... other routes go here...*/}
        </Stack>
    )
}
Initial screen
This one is very straightforward, it’s a static screen with a big “Start workout” button. Clicking on this button will send a request to our API to start the workout, which will return a workoutId. We’ll keep track of this ID somewhere then send them on to the next screen.
Let’s write a simple screen:
export default function LogWorkoutScreen() {
    async function handleStartWorkout() {
        router.navigate("/log-workout/select-exercise");
    }

    return (
        <ScreenLayout screenHasHeader={false}>
            <Box padding={20}>
                <Heading>Log workout</Heading>
                <Button title="START" onPress={handleStartWorkout} />
            </Box>
        </ScreenLayout>
    )
}
Then call our API:
async function handleStartWorkout() {
    const { workoutId } = await startWorkout({ sessionToken });
    if (!workoutId) {
        Alert.alert("Failed to start workout, please try again.");
        return;
    }

    router.navigate("/log-workout/select-exercise");
}
Now we have a workout ID, we need to persist it somewhere. I thought of two places that I could store this:
- In a global store
- In a path variable, e.g.
/log-workout/{workoutId}/select-exercise
I decided to put it in a global store for now, not because of any technical reason - simply because that’s something I already know how to do.
In our auth store, we persisted data using expo-secure-store. Since workout data is not particularly sensitive, let’s store it in AsyncStorage which is an unencrypted, persistent, key-value store.
We need to install it first:
npx expo install @react-native-async-storage/async-storageThen write our store:
import { create } from "zustand";
import AsyncStorage from "@react-native-async-storage/async-storage";
import { createJSONStorage, persist } from "zustand/middleware";

export type WorkoutState = {
    workoutId: number | null,
    startWorkout: (workoutId: number) => void,
    hasWorkoutInProgress: () => void
}

export const useWorkoutStore = create(
    persist<WorkoutState>(
        (set, get) => ({
            workoutId: null,
            startWorkout(workoutId: number) {
                set({ workoutId });
            },
            hasWorkoutInProgress() {
                const { workoutId } = get();
                return workoutId !== null;
            }
        }),
        {
            name: 'workout-storage',
            storage: createJSONStorage(() => AsyncStorage)
        }
    )
);
Unlike expo-secure-store we don’t need to write our own adapter to persist our data - AsyncStorage satisfies StateStorages interface.
Then update our event handler to store the workout ID in the store:
async function handleStartWorkout() {
    const { workoutId } = await startWorkout({ sessionToken });
    if (workoutId === null) {
        Alert.alert("Failed to start workout, please try again.");
        return;
    }

    workoutStore.startWorkout(workoutId!);

    router.navigate("/log-workout/select-exercise");
}
One thing which I noticed whilst developing this screen is that when going through the “Start workout” flow, we end up with a bunch of workout IDs for workouts that were started, but not finished. To get around this, when you click “START”, we’ll check for any workouts that are in progress:
if (workoutStore.hasWorkoutInProgress()) {
    console.log('Workout already started.');
    router.navigate('/log-workout/select-exercise');
    return;
}
In the future, we’ll implement some sort of “Resume workout” functionality, but for now, we’ll just send them into their workout.
That’s it for this screen, we now have the workoutId available throughout the process, which we’ll need later on to log individual exercises.
Select exercise screen
This is where the user selects the exercise they want to perform. When the screen loads it will show a list of all exercises, and typing in the search box will filter them. Because the list of exercises is small (< 100), I think we can get away with loading a list of ALL exercises filtering in memory with a primitive text search.
Side note: In the future, we’ll improve this by performing the search operations on the server, this will be especially useful as the number of exercises increase.
I realised we don’t actually have an endpoint which lists available exercises from our database, so let’s write that quickly…
@GetMapping("/api/v1/workout/exercise")
public ResponseEntity<ApiResponse> handleListExercises() {
    List<Exercise> allExercises = exerciseSearchService.search();
    ListExerciseResponse response = new ListExerciseResponse(allExercises);
    return ResponseEntity.ok(response);
}
Now that we have that working, let’s write the screen itself. We’ll need to split this up into 2 different components.
A SearchBox for filtering:
type SearchBoxProps = {
    query: string,
    onChangeQuery: (newQuery: string) => void
}

export default function SearchBox({ query, onChangeQuery }: SearchBoxProps) {
    function handleClear() {
        onChangeQuery('');
    }

    return (
        <View style={styles.searchBoxContainer}>
            <TextInput
                style={styles.searchBox}
                defaultValue={query}
                onChangeText={onChangeQuery}
                placeholder="Enter an exercise name..."
            />
            {
                query.length > 0 ?
                <View style={styles.clearButton}>
                    <Text style={styles.clearButtonText} onPress={handleClear}>Clear</Text>
                </View> :
                null
            }
        </View>
    )
}
This component doesn’t really do much, just propagates the TextInputs onChangeText event to the parent component.
And an ExerciseList for displaying the exercises:
type ExerciseListProps = {
    exercises: Exercise[],
    onSelectExercise: (exercise: Exercise) => void
}

export default function ExerciseList({ exercises, onSelectExercise }: ExerciseListProps) {
    if (!exercises) {
        return <Text>Loading exercises...</Text>
    }

    if (exercises?.length === 0) {
        return <Text>No exercises found</Text>;
    }

    return (
        <View style={styles.container}>
            <FlatList
                style={styles.exerciseList}
                data={exercises}
                renderItem={({ item: exercise }) => (
                    <Pressable
                        style={styles.exerciseListItem}
                        onPress={() => onSelectExercise(exercise)}>
                            <Text style={styles.exerciseListItemName}>
                                {exercise.name}
                                {exercise.brand ? `(${exercise.brand})` : null}
                            </Text>
                    </Pressable>
                )}
            />
        </View>
    )
}
In the parent component, we’ll fetch the list of exercises and provide it as a prop to ExerciseList (I could have used react-query to fetch the exercises, but for now we’ll just do it manually):
const [exercises, setExercises] = useState<Exercise[]>([]);

useEffect(() => {
    (async () => {
        const response = await listExercises({ sessionToken });
        setExercises(response.exercises);
    })();
}, []);
<ExerciseList
    exercises={exercises}
    onSelectExercise={handleSelectExercise}
/>
So now we have a list of exercises displayed, but the search box isn’t filtering them, let’s filter the list of exercises. We could do this inside the handleChangeQuery event handler (which is invoked when the search box’s text changes):
function handleChangeQuery(newQuery: string) {
    setQuery(newQuery);

    const filteredExercises = filterExercises(exercises, newQuery);
    setExercises(filteredExercises);
}
However this has a few problems:
- We lose the original unfiltered list of exercises and would have to create another state variable to hold the filtered list
- It causes two re-renders, this is unnoticeable to me, but is just unnecessary work that doesn’t need to be done.
We can compute the filtered exercises in the component body from the exercises and query variables (irrelevant code has been removed):
export default function SelectExerciseScreen() {
    const [query, setQuery] = useState<string>('');
    const [exercises, setExercises] = useState<Exercise[]>([]);

    function handleChangeQuery(newQuery: string) {
        setQuery(newQuery);
    }

    // Do it here instead
    const filteredExercises = filterExercises(exercises, query);

    return (
        <ScreenLayout screenHasHeader={false}>
            <Box padding={20}>
                <ExerciseList
                    exercises={filteredExercises}
                    onSelectExercise={handleSelectExercise}
                />
            </Box>
        </ScreenLayout>
    )
}
Much better.
Our exercise list is looking a bit bare, so at this point I’ll update my migration to add a bunch more exercises from my spreadsheet.
The only thing we have left to do now is keep track of the exercise that is currently selected, we can do this by storing it in our workout store after an exercise is selected:
const setCurrentExercise = useWorkoutStore(state => state.setCurrentExercise);

function handleSelectExercise(selectedExercise: Exercise) {
    console.log('Selected', selectedExercise);
    setCurrentExercise(selectedExercise);
    router.navigate('/log-workout/exercise-summary');
}
Exercise summary screen
This screen displays a list of completed sets for the currently selected exercise, and the user can also add their sets to the current exercise.
We want the screen’s header to be dynamic (display the currently selected exercise’s name), which requires us to move the <Stack.Screen> component into the route file, so we remove it from _layout.tsx and add it to our exercise-summary.tsx route:
export default function ExerciseSummaryScreen() {
    const workoutStore = useWorkoutStore();
    const router = useRouter();
    const params = useLocalSearchParams()

    useEffect(() => {
        router.setParams({
            title: workoutStore.currentExercise?.name
        });
    }, []);

    return (
        <ScreenLayout screenHasHeader={true}>
            <Stack.Screen
                options={{
                    title: params.title
                }}
            />
        </ScreenLayout>
    )
}
Setting the params must be inside a useEffect, as setting it causes a re-render (and in turn, an infinite loop!).
Our page contains two sections:
- A button to send them to the add exercise to workout screen
- A table containing completed sets
To display the list of completed sets, we’ll need to ask the server for exercises completed with a specific workout_id and exercise_id. We actually didn’t build this endpoint yet (another one I forgot!), so first let’s go ahead and write that:
@GetMapping("/api/v1/workout/{workoutId}/exercise/{exerciseId}")
public ResponseEntity<ApiResponse> handleListCompletedSetsForExercise(
        @PathVariable Integer workoutId, @PathVariable Integer exerciseId, @AuthenticationPrincipal User user) {
    var completedSets = workoutService.listCompletedSetsForExercise(user, exerciseId, workoutId);
    return ResponseEntity.ok(new ListCompletedSetsForExercise(completedSets));
}
This endpoint returns data in the following format:
{
    "completedSets": [
        {
            "id": 23,
            "weight": 100.5,
            "sets": 100,
            "reps": 1,
            // ... other fields ...
        },
        // .. rest
    ]
}
Now let’s write a component to display the completed sets, we’ll call this component <CompletedSets>:
type CompletedExercisesProps = {
    completedSets: CompletedSet[]
}

export default function CompletedSets({ completedSets }: CompletedExercisesProps) {
    return (
        <View>
            <View style={styles.tableHeader}>
                <Text style={styles.tableHeaderCol}>Sets</Text>
                <Text style={styles.tableHeaderCol}>Reps</Text>
                <Text style={styles.tableHeaderCol}>Weight</Text>
            </View>
            <FlatList
                style={{}}
                data={completedSets}
                renderItem={({ item: completedSet }) => (
                    <Pressable
                        style={styles.tableRow}
                        onPress={() => {}}>
                            <Text style={styles.tableCol}>{completedSet.sets}</Text>
                            <Text style={styles.tableCol}>{completedSet.reps}</Text>
                            <Text style={styles.tableCol}>{completedSet.weight}kg</Text>
                    </Pressable>
                )}
            />
        </View>
    )
}

const styles = StyleSheet.create({
    tableHeader: {
        flexDirection: 'row'
    },
    tableHeaderCol: {
        flex: 1,
        fontWeight: 'bold',
        fontSize: 24
    },
    tableCol: {
        flex: 1,
        fontSize: 18
    },
    tableRow: {
        flexDirection: 'row'
    }
});
I haven’t done any data fetching inside this component because we’ll use it on our exercise summary screen which can display multiple exercises, so if there are 20 exercises, we’ll end up making 20 API calls, which is very wasteful.
It contains an extremely quick implementation of a table just to get the data displayed - we will improve it later on and add other features like sorting, column totals, and buttons to remove/edit sets.
And that’s it for this screen, the final screen looks like this:
export default function ExerciseSummaryScreen() {
    const workoutStore = useWorkoutStore();
    const router = useRouter();
    const params = useLocalSearchParams()
    const authStore = useAuthStore();
    const [completedSets, setCompletedSets] = useState<CompletedSet[]>([]);

    useEffect(() => {
        router.setParams({
            title: workoutStore.currentExercise?.name
        });

        async function init() {
            const { completedSets } = await listCompletedSetsForExercise({
                sessionToken: authStore.sessionToken,
                workoutId: workoutStore.workoutId!,
                exerciseId: workoutStore.currentExercise!.id
            });
            setCompletedSets(completedSets);
        }

        init();
    }, []);

    return (
        <ScreenLayout screenHasHeader={true}>
            <Stack.Screen
                options={{
                    title: params.title
                }}
            />
            <Box padding={20}>
                <Button title="Add set" href="/log-workout/add-exercise-to-workout" />

                <CompletedSets completedSets={completedSets} />
            </Box>
        </ScreenLayout>
    )
}
Side note, we’ll replace the fetching inside
useEffectwithreact-querylater on, for now I’m just trying to get something working. I’m fully aware the data will not be re-fetched when it updates!
Add exercise to workout screen
This screen contains a form the user fills in to add a set to an exercise.
Let’s write the form first:
export default function AddExerciseToWorkoutScreen() {
    const {
        control,
        handleSubmit,
        formState: { errors },
        getValues
    } = useForm<AddExerciseForm>({
        mode: "all",
        defaultValues: {
            weight: 0,
            sets: 1,
            reps: 1,
            notes: '',
            equipment: ''
        }
    });

    return (
        <ScreenLayout screenHasHeader={true}>
            <Box padding={20}>
                {/* Weight */}
                <View style={formStyles.inputContainer}>
                    <Text style={formStyles.label}>Weight</Text>
                    <Controller
                        control={control}
                        name="weight"
                        rules={{
                            min: {
                                value: 1,
                                message: 'Weight must be at least 1KG'
                            }
                        }}
                        render={({ field: { onChange, value } }) => (
                            <TextInput
                                value={String(value)}
                                onChangeText={onChange}
                                style={formStyles.input}
                            />
                        )}
                    />
                    <FieldErrorMessage fieldError={errors.weight} />
                </View>

                {/* Sets */}
                <View style={formStyles.inputContainer}>
                    <Text style={formStyles.label}>Sets</Text>
                    <Controller
                        control={control}
                        name="sets"
                        rules={{}}
                        render={({ field: { onChange, value } }) => (
                            <TextInput
                                value={String(value)}
                                onChangeText={onChange}
                                style={formStyles.input}
                            />
                        )}
                    />
                    <FieldErrorMessage fieldError={errors.sets} />
                </View>

                {/* Reps */}
                <View style={formStyles.inputContainer}>
                    <Text style={formStyles.label}>Reps</Text>
                    <Controller
                        control={control}
                        name="reps"
                        rules={{}}
                        render={({ field: { onChange, value } }) => (
                            <TextInput
                                value={String(value)}
                                onChangeText={onChange}
                                style={formStyles.input}
                            />
                        )}
                    />
                    <FieldErrorMessage fieldError={errors.reps} />
                </View>

                {/* Notes */}
                <View style={formStyles.inputContainer}>
                    <Text style={formStyles.label}>Notes</Text>
                    <Controller
                        control={control}
                        name="notes"
                        rules={{}}
                        render={({ field: { onChange, value } }) => (
                            <TextInput
                                value={String(value)}
                                onChangeText={onChange}
                                style={formStyles.input}
                            />
                        )}
                    />
                    <FieldErrorMessage fieldError={errors.notes} />
                </View>

                {/* Equipment */}
                <View style={formStyles.inputContainer}>
                    <Text style={formStyles.label}>Equipment</Text>
                    <Controller
                        control={control}
                        name="equipment"
                        rules={{}}
                        render={({ field: { onChange, value } }) => (
                            <TextInput
                                value={String(value)}
                                onChangeText={onChange}
                                style={formStyles.input}
                            />
                        )}
                    />
                    <FieldErrorMessage fieldError={errors.equipment} />
                </View>

                <Button
                    title="Add"
                    onPress={handleSubmit(() => {})}
                />
            </Box>
        </ScreenLayout>
    )
}
Very simple stuff.
After submitting the form, we need to call our endpoint /api/v1/workout/{workoutId}/exercise/ to add the exercise to the workout, then send to user back to the exercise summary page:
async function handleAddSet() {
    console.log('Adding set', getValues());
    setIsLoading(true);

    const formValues = getValues();
    const { success } = await logExercise({
        workoutId: workoutStore.workoutId!,
        exerciseId: workoutStore.currentExercise?.id!,
        weight: formValues.weight,
        sets: formValues.sets,
        reps: formValues.reps,
        notes: formValues.notes,
        equipment: formValues.equipment.split(','),
        sessionToken: authStore.sessionToken
    });

    if(!success) {
        console.error('Failed to log workout');
        // todo: Handle server-side validation errors.
    } else {
        // No need to navigate anywhere, just pop the screen off the navigation stack.
        router.dismiss();
    }

    setIsLoading(false);
}
This is a very primitive implementation, it doesn’t handle a number of things:
- Server-side validation response
- Failed requests
- Request cancelling
For now it will suffice - as with most other things in this post…we’ll improve it later on!
Workout summary screen
This screen lists all of the exercises that have been performed for the current workout.
Our performed exercises live in the database in the workout_exercise table, we could just return those to the client, but then the client would have to do some manual grouping to display them, a better alternative would be to return a structure like this:
{
    "exercises": [
        {
            // This is the `Exercise` model data
            "id": 1,
            "name": "Back squat",
            // ...other Exercise props
            "performed": [
                // This is the `WorkoutExercise` model data
                {
                    "id": 23,
                    "weight": 100.5,
                    "sets": 100,
                    "reps": 1
                }
            ]
        }
    ]
}
This requires more code on the server, but means the client can just loop over the exercises array.
Let’s write our service method to achieve this:
public List<ExerciseWithCompletedSets> listExercisesForWorkoutId(@NotNull User user, @NotNull Integer workoutId) {
    var workout = workoutDao.findOneWithUser(workoutId);
    if (workout == null) {
        return Collections.emptyList();
    }

    if (!workout.getUser().equals(user)) {
        return Collections.emptyList();
    }

    // Fetch ALL the exercises for this workout
    var allWorkoutExercises = workoutExerciseDao.findAllByWorkoutId(workoutId);

    // Create a map of Exercise => WorkoutExercise so it's easier to work with
    Map<Exercise, List<WorkoutExercise>> exerciseToWorkoutExerciseMap = allWorkoutExercises.stream()
        .collect(Collectors.groupingBy(WorkoutExercise::getExercise));

    // Map it to our model
    return exerciseToWorkoutExerciseMap.entrySet().stream().map(entry -> {
        var exercise = entry.getKey();
        var workoutExercises = entry.getValue();

        var exerciseWithCompletedSets = new ExerciseWithCompletedSets();
        exerciseWithCompletedSets.setId(exercise.getId());
        exerciseWithCompletedSets.setName(exercise.getName());

        var completedSets = workoutExercises.stream()
            .map(this::mapFromWorkoutExercise)
            .toList();
        exerciseWithCompletedSets.setCompleted(completedSets);

        return exerciseWithCompletedSets;
    }).toList();
}
This is fairly simple, most of the complexity comes from mapping between our models WorkoutExercise and Exercise to our view models ExerciseWithCompletedSets and CompletedSet.
One feature which I had totally forgotten about was Collectors#groupingBy which makes creating a map from a list a breeze - initially I wrote this by manually constructing the map before asking Gemini if there was a simpler way to write it.
Now we can create a screen which calls this endpoint on mount, then displays completed sets with our CompletedSets component:
export default function SummaryScreen() {
    const workoutId = useWorkoutStore(state => state.workoutId);
    const sessionToken = useAuthStore(state => state.sessionToken);
    const [exercises, setExercises] = useState<ExerciseWithCompletedSets[]>([]);

    useEffect(() => {
        async function init() {
            if (!workoutId) {
                return;
            }

            const { exercises } = await listWorkoutExercises({
                sessionToken,
                workoutId
            });

            setExercises(exercises);
        }

        init();
    }, [])

    // todo: Add loading state

    // No exercises for this workout yet.
    if (!exercises || !exercises.length) {
        return (
            <ScreenLayout screenHasHeader={false}>
                <Box padding={20}>
                    <Text>No exercises have been logged for this workout yet.</Text>
                </Box>
            </ScreenLayout>
        )
    }

    return (
        <ScreenLayout screenHasHeader={false}>
            <Box padding={20}>
                <Text>Here is your workout summary...</Text>
                {
                    exercises.map(exercise => {
                        return (
                            <View key={exercise.id}>
                                <Heading>{exercise.name}</Heading>
                                <CompletedSets completedSets={exercise.completed} />
                            </View>
                        )
                    })
                }

                <Button title="Add new exercise" href="/log-workout/select-exercise" />
                <Button title="Finish workout" onPress={() => {}} />
            </Box>
        </ScreenLayout>
    )
}
Again, this is very primitive, but works fine for this initial version.
Confirmation modal
This modal’s purpose it to get confirmation from the user before completing their workout. It prevents users from prematurely completing their workout.
For the initial implementation we’ll just use React Native’s Alert (link) component, and hook it up to an event handler like so:
async function handleConfirmFinishWorkout() {
    Alert.alert(
        'Confirm finish workout',
        'Are you sure you want to finish your workout?',
        [
            {
                text: 'Cancel',
                style: 'cancel'
            },
            {
                text: 'Yes',
                onPress: () => {
                    handleFinishWorkout();
                }
            }
        ]
    )
}

async function handleFinishWorkout() {
    console.log('User wants to finish their workout');

    const { success } = await finishWorkout({
        sessionToken,
        workoutId
    });

    if (!success) {
        Alert.alert('Failed to finish workout');
        return;
    }

    console.log('Workout finished.');

    // Get rid of workout state
    clear();

    // Go back to the first screen
    router.dismissAll();
}
Clicking the button correctly finishes the workout in the database, and takes us back to the first screen in our app.
Conclusion
We’ve now built a rough version of the main functionality in our app - there’s still a great deal to improve on:
- Using
react-queryinstead of ad-hoc API calls inuseEffects - Better handling of loading and error states for API calls
- Fixing bugs where the data on the screen is stale, one example: when you add a set to an exercise and go back to the exercise summary screen, it doesn’t show the new set until you go back and revisit the screen.
- Standardising the terminology used on client and the server (and improving the names)
- Missing functionality:
- You cannot edit/delete sets or exercises
- You cannot add notes to the workout
- Notes and equipment aren’t displayed for each exercise
- …and more
Writing posts as I go along has been fun, but has also been a lot more time consuming than just building the app. Going forward I’m only going to create posts on smaller pieces of work (refactoring, solving a specific bug, etc) instead of documenting every single step of the process - this may change depending on available time and motivation.